Apple

From Movie Magic to Photographic Mastery | Lisa Carney

Thoroughly enjoyed chatting with Hollywood Movie Poster / Art Work Retoucher Lisa Carney and uncovering the HOW, WHAT and WHY of her personal work, her photography, process, retouching, personal projects and travel.

At the beginning of this recording check out the slideshow of her images and then learn how she captures and edits them because I guarantee, like me, you’ll be blown away!

Links mentioned in the video

Website: lisacarney.com (Portfolios, Photoshop Tutorials, Courses and more … )

Grief ( Art as Therapy - Personal Project ) LINK

Instagram: @lisacarney

The Lightroom Virtual Summit 2024: bit.ly/lvs-2024

Glyn’s Adobe Lightroom Community Page: LINK

Unsurprisingly, Lisa was a HUGE hit judging by some of the comments posted already from folks watching the recording …

Editing my Photographs in Lightroom on my iPad Pro

Now that I’ve been able to calibrate the screen on my iPad Pro, I’m really enjoying it when from time to time I retouch some of my pictures on it; reason being that the results on my calibrated iPad Pro are extremely close to how they look on my calibrated BenQ SW 272U Display.

I always struggled taking it seriously before now because it wasn’t calibrated and thought …

What’s the point when I’d then have to go and make corrections
in Lightroom on my desktop afterwards?
— Me (Before)

But now this is definitely not the case …

I actually had the technical folks at Calibrite reach out to me after having seen the iPad Pro calibration video I shared on my YouTube channel, asking if I’d be able to do a 2nd calibration to check whether the one I did was indeed accurate; and it most definitely was …

  • Target Luminance = 100cd/m2

  • Achieved Luminance = 99.355cd/m2

  • Target X = 0.3127

  • Achieved X = 0.313

  • Target Y = 0.3290

  • Achieved Y = 0.331

So yeah … the calibration of the iPad Pro screen worked a treat!

If you didn’t see the video I put together showing how to calibrate the iPad Pro and whaich also makes sense of what all this Luminance, X and Y stuff is all about, here it is …

So now, knowing that my iPad Pro screen calibration is good, I’m definitely making more use of it; not for every edit but just for those times when I just fancy sitting with my feet up in front of the TV and tinkering and when out and about on a phot shoot and then grabbing a coffee.

Also on those occasions if I haven’t finished the editing, when I get back home in front of my main computer I can just pick up in Lghtroom on my desktop from where I got to in Lightroom on my iPad Pro; such is the way that Lightroom syncs across all devices.

Clever stuff!

Actually on the subject of getting home and diving back on to my main computer, I’ve some new kit coming that is going to improve my workflow, set up and backing up, so I’ll make sure to share about that here and in a video 👍🏻

Calibrating my iPad Pro for Photography

One thing I always do when taking portraits is shoot tethered and that always used to be with my camera connected to my MacBook Pro or laptop BUT that has now changed to being my iPad because its way more portable and convenient.

I use the CaptureOne app for the tethering which works so incredibly well .. literally just open the app, plug in your camera (you can also use it wirelessly) and you’re up and running. You can even use it to tether to your iPhone … if you have one.

The only problem i find is that the screen on the iPad out of the box is too contrasty … its set up so that it gives the richest colours and the deepest blacks for when using apps, watching movies, playing games, looking at pictures which is great but not ideal for when using it when tethering.

However I have the 6th generation 12.9” iPad Pro running iOS 17.3.1 and this has Reference mode and this we can use to kind of calibrate the screen to something more suitable for photography.

NOTE:
Reference mode is actually available on 12” iPad Pro 5th generation or later and requires iOS 16 or later.

iPhone Photography using Neutral Density Filters ... Why ???

With the rise in popularity of mobile photography, a new industry has developed producing add-ons such as grips to make using your iPhone more like using a regular camera along with bluetooth shutter buttons, lenses, filters and more.

I’ll cover lenses in future posts and videos but for now I just wanted to concentrate on filters … in particular ND (Neutral Density) filters.

I’m writing this on Day 1 of the KelbyOne iPhone Photography Conference for which I’m presenting 2 classes, namely … …

  • Capturing Pro Quality Portraits

  • Essential Gear for the Modern iPhone Photographer

It was in the preapration for both of these sessions that I did A LOT of testing and research and in the process learned a lot more, or rather uncovered a lot more about the iPhone.

UnderStanding Neutral Density Filters

First, let's grasp the concept of neutral density filters. These accessories are essentially pieces of glass that reduce the amount of light entering the camera lens without affecting the color or hue of the image. They are commonly used in photography to achieve effects such as blurring motion in bright conditions or using wide apertures in daylight.

I’ve used them in the past many times with my main camera, my Sony A7RIV when venturing out taking seascape images such as this one here at Trevose Head in Cornwall.

Using Neutral Density Filters made it possible for me to correctly expose the image with a 2 second exposure to give motion and blur to the waves as they crash against the rocks …

I’ve also used them with my Sony to capture this 30 second exposure of Teignmouth Pier in Devon …

long exposure seascapes with my iphone

Over the past year or so I’ve been capturing seascapes more and more with my iPhone thanks to apps like ReeXpose that make all of this possible by instead of the need for Neutral Density Filter, computatiopnally blending a series of images together to create the long exposure effect … and doing so incredibly quickly.

The app works incredibly well and allows the user to capture exposures from ½ second all the way to Bulb Mode, and using it I’ve taken what I consider my best seascape images to date …

Lyme Regis

Blend of ½ Second and 1 Minute Exposures in Photoshop taken with ReeXpose Long Exposure App

Lyme Regis

1 Minute Long Exposure using the ReeXpose Long Exposure App

Prince of Wales / Severn Bridge over the Bristol Channel

1 Minute Long Exposure using the ReeXpose Long Exposure App

The ReeXpose app produces Raw files, but like every other long exposure app available at the moment, those are limited to 12MP Bayer Raw files, which despite not sounding much by todays standards, are very acceptable and workable. Digitalab even printed one of my iPhone long exposure 12MP Bayer Raw File images at 72” on the longest edge, and it came out looking great …

However, despite being 12MP and me being VERY happy with the results I wish there was a way to produce 48MP long exposure files from my iPhone using these kind of apps but that’s just not possible at the moment.

So when I got hold of the new range of Neutral Density Filters from ReeFlex for use with my iPhone it got me thinking …

Would it be possible to use the Neutral Density Filters with one of the Pro Camera Apps that are available so that I could use them to shoot at 48MP in Apple ProRaw AND slow the shutter down … basically capture a long exposure the traditional way? I mean why else would there be Neutral Density filters available for the iPhone?

close but no cigar

So can it be done?

Well, the short answer is NO.

You see first of all when using the iPhone along with one of the Pro Camera Apps available like ReeFlex, Moment, CameraPixels and so on, if you set them to shoot at 48MP in Apple ProRaw and then adjust the exposure using the Shutter Speed or ISO, the file instantly drops to 12MP.

The only adjustment you can make and keep in 48MP is using the EV (Exposure Vlaue) slider which is basically the equivalent of dragging your finger on the screen to brighten or darken image as you would in the native Apple iPhone camera app, so no good for long exposure.

If you leave the settings alone though and then just add on the Neutral Density filters, sure enough you can slow the shutter down … but don’t get too excited, because no matter how many Neutral Density filters you stack on top of each other, the shutter speed will NOT go slower than 1/15 sec

Even with all the ND Filters I have stacked on front of my iPhone … 1/15 sec is all that’s possbile in ProRaw at 48MP.

Oh and by the way that’s 29 Stops of Neutral Density right there 😳

ReeFlex Pro Camera App
48MP ProRaw in AUTO

If you make ANY changes to the Shutter Speed or ISO then the file drops to 12MP …

ReeFlex Pro Camera App
12MP ProRaw

So looking at this, with the way the current iOS works, what is the point of Neutral Density FIlters for Photography with the iPhone?

If you want the scene darker or brighter then you could just use the EV slider and that would remain in Apple ProRaw at 48MP, but you can’t take the shutter speed slower than 1/15sec and remain in 48MP. Period!

are all 12mp files the same?

Now if we just accept the whole 48MP and 12MP thing how about this …

Raw Long Exposure Apps for the iPhone do so by computationally blending a series of shots to create the final long exposure image as a 12MP Bayer Raw File.

You can see this really clearly when you set a ½ second exposure time.

Look at the image below and notice the overlapping of files. You don’t notice this at longer exposure times but with fewer images taken at a faster long exposure (if that makes sense) it makes it harder to blend together … because there’s less files to overlap.

You do need to really look to see it but once you do, you can’t un-see it as shown in the zoomed in image below …

So here then is my thinking, which I hasten to add I am popping out tomorrow morning to test …

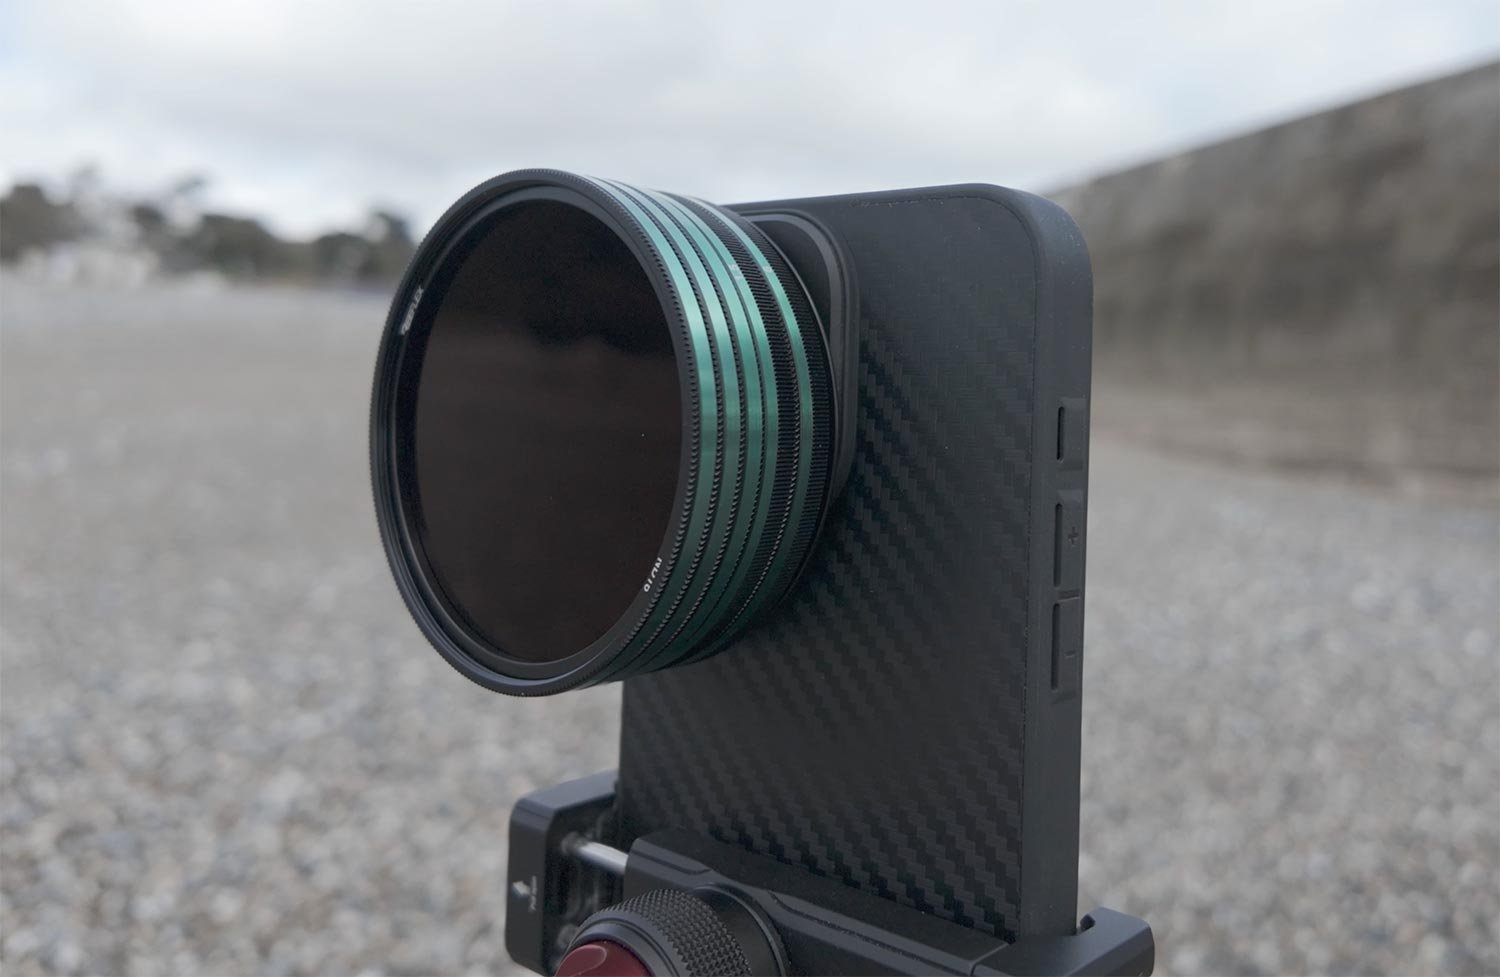
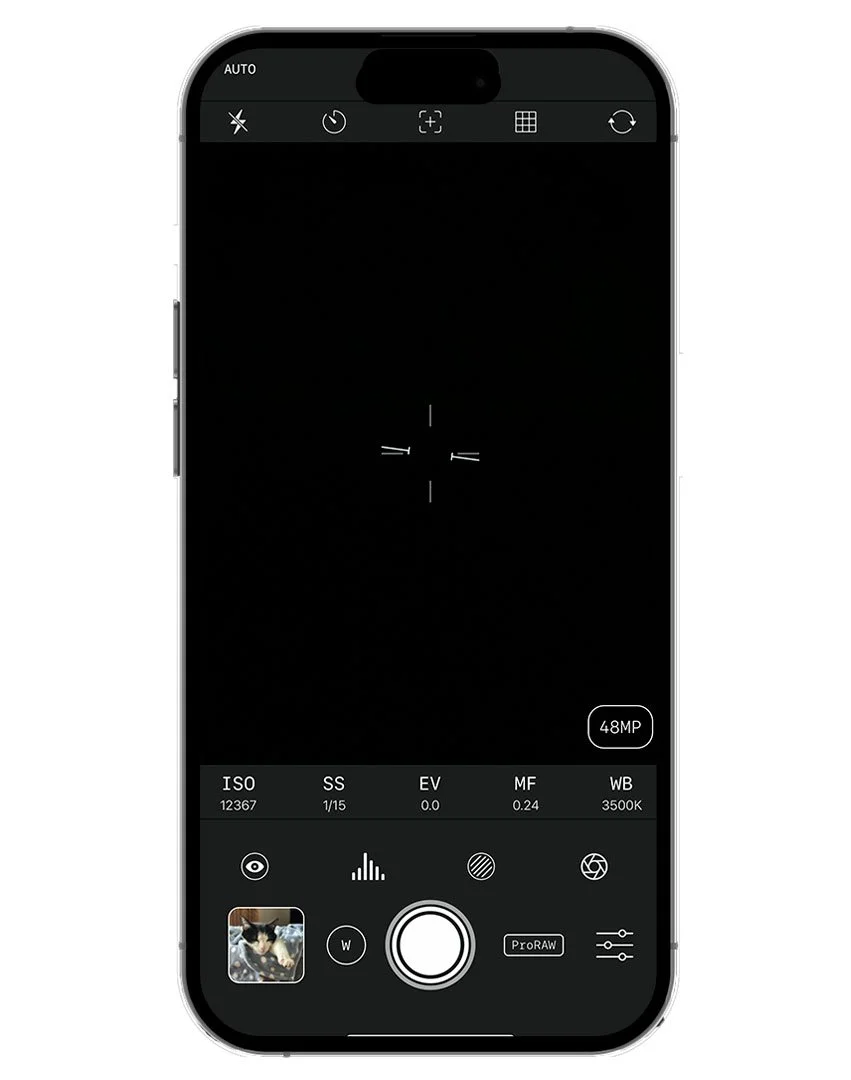
Accepting that if I use manual controls the file will drop to 12MP, what if I use the Neutral Density Filters to get a correct exposure with a shutter speed of ½ second or the maximum of 1 second?

Thinking of this in really basic terms … as that’s not being used to blend images together, it should in theory produce a single shot long exposure right? When I’m sat in my office with the phone in those manual settings and move it around the image is blurry so that should work for moving objects like the sea right?

I’ll keep you posted with the testing once I’ve been out tomorrow.

Just to add though … the slowest shutter speed you can set is 1/1 sec so for anything longer than that it calls for one of the long exposure apps that does the computational blending thing.

Apple Proraw isn’t really raw

Whatever the technical reason / limitations there are for this I really do hope in the near future this is overcome, otherwise Apple continually calling the camera system “Pro” could start to get a little bit "Boy who cried Wolf” if you know what I mean.

That said though, because of how Apple ProRaw works, there may well be times you wouldn’t want to use it anyway because of the processing it applies to the files i.e. Noise Reduction and Smart HDR.

I’m going to be covering that very soon in another article and video.

ND FILTERS WITH iPHONE FOR VIDEO ???

This is a definite YES though and I’ll be covering that in a post and video VERY soon.

Right, I’ll go charge my filming kit for tomorrow and keep you posted once I’m done with the testing 👍🏻

The MOST ANNOYING thing about the iPhone

The more people I mention this to, the more I’m aware that it’s not common knowledge or at least its something that hasn’t been noticed, but Apple promoting the 48MP sensor of the iPhone is not all its made out to be.

Now don’t get me wrong, I’m a BIG advocate of mobile photography. I’m loving getting out and capturing seascapes. I love the convenience of it and I’m loving the results and ease of doing so. Of course it calls for the usual skills such as understanding light and composition and anyone that says it’s the phone doing that essential part for you is well, quite frankly, missing the point.

My best landscape / seascape images I’ve taken with my iPhone however when it comes to portraiture it is limited. We can capture natural light and I’m experimenting more and more with constant LED light and glad to say, having a level of success. ProFoto even have a strobe on the market that the iPhone is capable of triggering; if you’ve never seen examples of this then I’d highly recommend you check out Russell Brown on Instagram and / or Facebook. I also am very aware that a certain lighting company is also working on their own strobe and app capable of being triggered by the iPhone, so there’s lots of exciting things on the nearing horizon.

However, certainly at the time of writing this there is, in my opinion a HUGELY annoying and disappointing aspect of iPhone photography, and that’s how Apple have the camera system set up.

Let me explain …

By default when we open the camera app on our iPhones, the system defaults to the 1x lens, and this is the lens that gives us the ability to take photographs at 48MP; any other lens we use 2x, 5x etc and we drop down to 12MP.

Now this isn’t anything out of the ordinary as I know from friends with other brands of phone cameras, that similar happens for them too, but with the iPhone 48MP Pro Raw is only available using the 1x lens AND when using AUTO settings!

This means if you change ANY setting that takes it out of AUTO, then you drop down to 12MP.

So if you’re using the Apple Camera App and tap and drag on the screen to lock or alter exposure, you drop from 48MP to 12MP.

If you use ANY of the Pro Camera Apps out there with their fancy all Bells and Whistles interfaces where you can alter White Balance, Shutter Speed, ISO and so on … the moment you alter ANY of them, you drop from 48MP to 12MP.

Now don’t get me wrong, the 12MP Bayer Raw files my then iPhone 14 Pro Max captured were great as are the ones from my iPhone 15 Pro Max; not the quality of my Sony Mirrorless, but still great and VERY useable. Infact I even had a 72” print done of one of my seascapes by Digitalab and the quality was very impressive, BUT I couldn’t help think at the time what it would have been like at 48MP … especially when editing.

Of course I’m going to continue taking photographs with my iPhone because I really do see this as becoming BIG in the near future and I thoroughly enjoy doing it, but unless / until Apple make it so that we can maintain 48MP out of Auto, then calling it Pro is pushing the truth somewhat. 12MP Raw is good but 48MP Raw is better!

There’s more I want to cover about this and will do so very soon because I’ve discovered something about using ND filters with the iPhone that I think will very much come as a surprise, so I’ll keep you posted when I share that.

Oh and finally, if you’re reading this and you use another brand of phone camera, I’d be intrigued to hear if you do in fact have the same thing happen when adjusting settings as I’ve mentioned, so please do share any comments / thoughts below.

Cheers,
Glyn

Photographing the Severn Bridge with my iPhone 15 Pro Max

So last weekend, having been there almost exactly 12 months ago and done the same, along with my mate Anthony Crothers I headed back Bristol to photograph the Severn Bridge (aka the Prince of Wales Bridge) …

Weather conditions this time were definitely warmer and less breezy although the tide height looked to be pretty much the same. From what I’d checked I had expected it to be a little higher than it actually was, but this worked in our favor to be honest with it revealing foreground interest in the mud / silt.

kit

Since the last visit, some of the kit I used this time had changed.

Of course as there had been an upgrade I was now using my iPhone 15 Pro Max, but to mount it onto my Benro Tripod I was using the Ulanzi ST-27 Phone Tripod Mount.

This thing is small, incredibly well built and robust and rock solid. Love it!

iphone photography app

There were some great clouds in the sky but due to there being very little breeze, they were moving incredibly slowly.

So, to create some motion blur and also smooth the water surface, I opted for a 60 second exposure and to do this I used the Raw long exposure app called ReeXpose App from ReeFlex …

Not wanting to go for an identical composition as the last time we were there, I opted to photograph the bridge from the lower right hand side which would include the bridge as it meandered off into the distance, so this is what I ended up with …

Edited in Lightroom and with a couple of tweaks in Photoshop, I couldn’t resist running a print off the Epson SC-P900, and with it being printed on an a3 sheet of Baryta 310 from Permajet, I couldn’t be happier 😃

As for the last time we were there 12 months ago, this below is the picture I made, however we do plan to head back in March when the the Severn Bore appears; not neccesarily to photograph the bore but to take advantage of the much higher water level.

As for the bore itself … I will most definitely be taking my drone along to capture some footage, so … watch this space 😉

ReeFlex iPhone G Series Lenses, Filters and Cases

There’s just 6 days remaining with the Kickstarter campaign that ReeFlex are running for their new G Series lenses, filters and cases.

The Kickstarter has already been a resounding success having been fully funded within 8 minutes of launch, and pledges for lenses and filters still continuing.

Those that have placed pledges for the G Series are expected to start taking delivery this coming January and having had time with the ‘near finished’ product I just know that everyone that gets them is going to be super happy!

Here’s a short video I put together from my experience with the lenses …

With just 6 days remaining from the day I post this article, there’s still time to make a pledge and grab some of the new kit by visiting the official Kickstarter Page …

HOW I EDIT theseiPhone Photographs in Lightroom

This is a recorsing of a LIVE Stream that I hosted on YouTube and Facebook on Sunday 29th October 2023 …

Join me for this LIVE stream as I go through the editing step sin Lightroom of some iPhone Portrait and Seascape photographs taken during a recent North Wales Road Trip …

***NOTE: The LIVE Feed cut off moments before the end of the broadcast however all relevant content was covered and all mentioned links are in the video description